Book A Demo
Categories
Planning & Design Blog

12 Sustainable & Eco-Friendly Building Materials Used In Construction

Some of the most sustainable and eco-friendly building materials in use today will surprise you. They’re not always the most expensive choice, and some will even save you money in the long run and add value to your construction project.

Fortunately, technological developments have accelerated in the construction sector over the last decade, and you have many building materials available.

While the UK government is funding grants for an additional 600,000 heat pumps in homes by 2028 as well as other decarbonising initiatives, there are voluntary steps we can take in the private sector to push us towards our collective net zero targets by 2050 – starting with making conscientious materials choices.

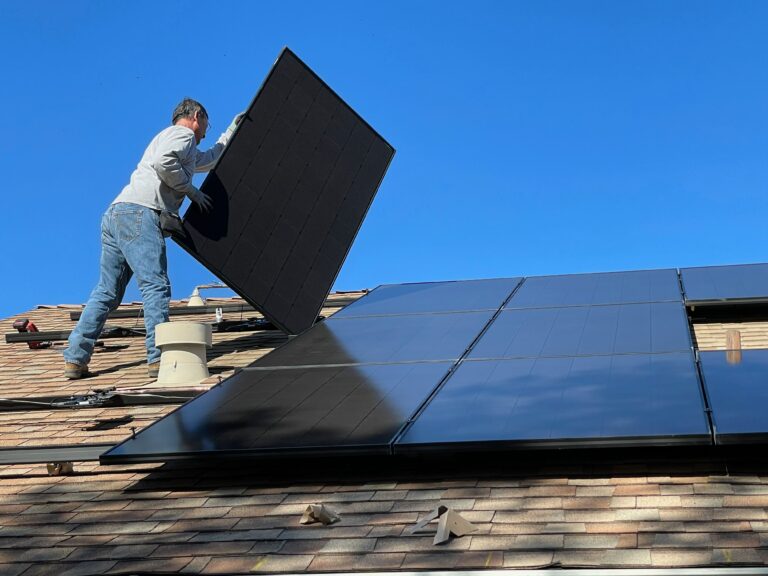
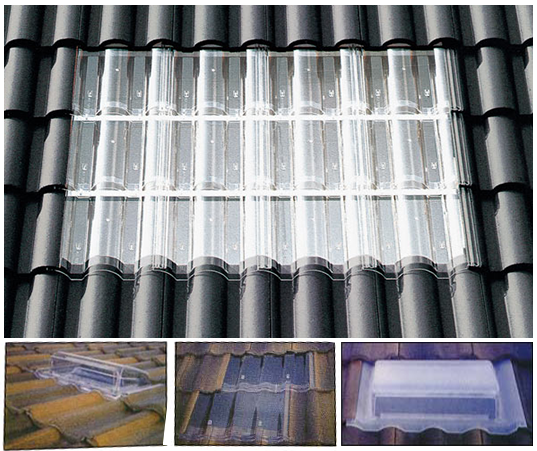
1. Solar Panels & Solar Tiles

Solar panels are an obvious choice, but since the spike in energy prices in 2022, there’s even more reason to design your construction project.

Around a decade or so, it was often remarked that solar panels would take around 20–25 years to pay off their initial upfront investment.

Now, estimates suggest that you could reach the break-even point in as little as 10 years for an average-sized residential property with a 4kW system – with an estimated annual saving of between £170–£565.

Commercial properties could see an even more impressive return on investment given their purchasing power.

2. Pallets & Crates

Pallets and crates are dirt cheap, and they can be repurposed for a variety of uses. Due to its varying tones, if treated properly, it can be a beautiful wood used both internally and externally. With them, you can build:

  • Decking
  • Sheds
  • Outdoor lounge seating
  • Planters
  • Small picket fences
  • Cladding for feature walls

If you’re using pre-loved pallets, you’ll need a team to clean, sand, stain, and seal the pallets before installation.

3. Paint That Doesn’t Contain VOC

Volatile organic compounds (VOCs) are chemicals that easily evaporate into the air and contribute to air pollution. Paints with VOCs can release chemicals into the air when the paint is applied but also for several days after application.

The VOC content in paint sold in the UK is required by law to be communicated on the product label. A product is considered to have low VOC content between 0.30% to 7.99%, and a product with minimal VOC has between 0% to 0.29%. Anything above that isn’t environmentally friendly.

Low VOC paints produce less odour and dry up to three times faster than solvent-based formulas.

4. Recycled Plastic

Plastic is a serious problem, and it accounts for over 90% of waste floating around in our oceans – around 46,000 per square mile.

Companies like Eco Plastic Wood use 100% recycled plastic to make their fence panels. The products have a 50+ year life; that’s over three times as long as wood fences, which last around 15–20 years.

You can also get 100% recycled plastic roof tiles that are designed to look like real slate.

5. Triple Glazing

Many buildings use double glazing as standard, but triple glazing is around 20–30% more energy efficient than double glazing. So even though they typically cost around 10–20% more, they’re more economically friendly as well as eco-friendly.

In terms of measuring heat retention, the U-value measures the heat transfer through a material.

  • Single-glazed windows have a U-value of around 5.0W/m²k
  • Double-glazed windows have a U-value of around 1.4W/m²k
  • Triple-glazed windows have a U-value of around 0.9W/m²k

6. 3D Printing Components

3D printing technology is in its infancy, but some pioneering companies are using it to manufacture and produce raw materials on-site.

  • The process of additive manufacturing adds successive layers of material to create products, only using what’s required.
  • Subtractive manufacturing removes material to create a product.

The subtractive process of using timber involves felling a tree, limb removal, log cutting, transportation, saw milling, drying, treatment, storage, and distribution.

That’s a heck of a journey.

Green building materials used in 3D-printed homes are constructed out of concrete, thermoplastics, clay, metals, and wood chippings and sawdust.
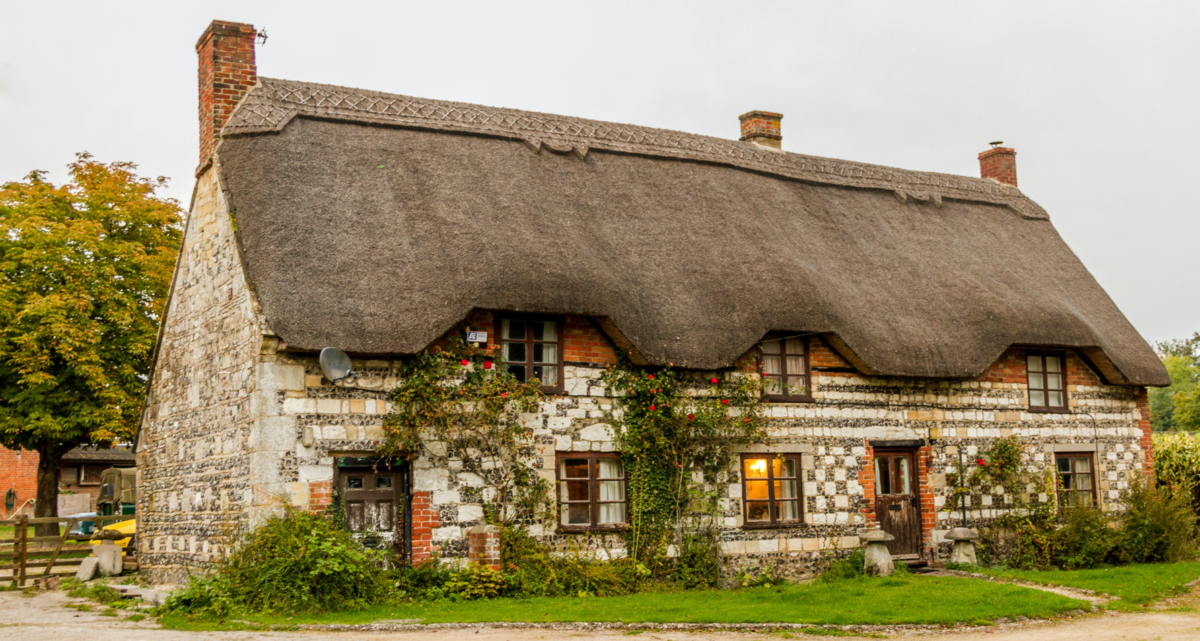
7. Straw Bales

And he huffed, and he puffed, and – the straw house stood strong!

The load-bearing method (aka Nebraska method) involves piling bales on top of each other and creating support for the roof. They’re then plastered with earthen or lime-based materials.

Here’s a useful technical guide for straw bale construction to give you everything you need to meet UK Building Regulations.

As well as structural purposes, straw can also be used to thatch roofs and as insulation.

8. Reclaimed Wood

In the UK, five million tonnes of waste wood are generated each year, only 1.4 million tonnes of which are recycled.

The rest is burnt or landfilled.

You have the choice between using a traditional timber merchant or a reclaimed wood merchant. One of the most cost-effective solutions can be flooring.

If you can’t get your hands on reclaimed wood, your next best alternative is FSC-certified timber, where trees are harvested responsibly, so there is no net loss of forest.

9. Sheep Wool

Sheep wool is an excellent insulator, and it’s as good as rock wool and mineral wool. Thermal conductivity is measured in W/mK, where a lower value indicates a better insulator.

  • Sheep wool has a thermal conductivity of 0.035 – 0.04 W/mK
  • Glass wool and mineral wool have a thermal conductivity of around 0.044 W/mK

Sheep wool can be purchased in rolls or used unprocessed – the obvious drawback being that it’s more expensive.

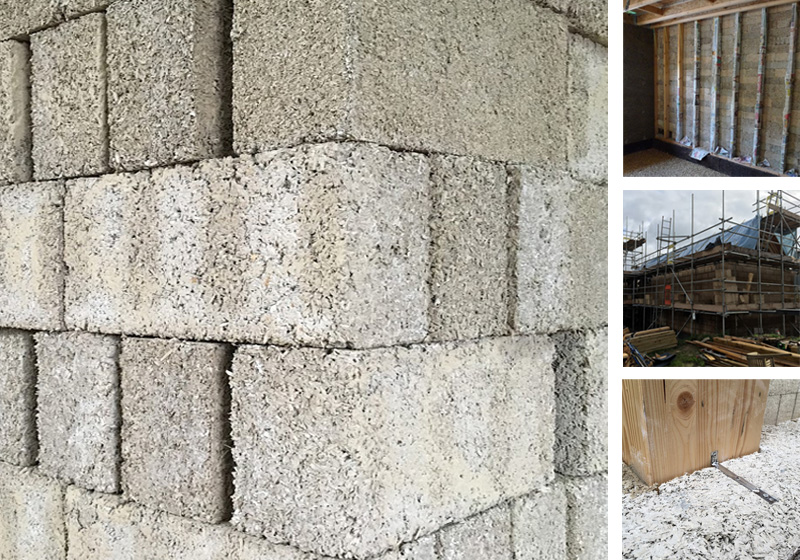
10. Hempcrete Blocks

Hemp blocks are building blocks made of a bio-composite of hemp mixed with lime and water. It’s an alternative to traditional insulation due to its lightweight structure.

Important! It’s not used as a load-bearing structural material.

As well the hemp being a plant, the lime that is added to it undergoes carbonation, where it absorbs carbon dioxide from the air and hardens over time.

For those reasons, hempcrete has a negative carbon footprint and can sequester around 8.6 kg of CO2  per cubic foot.

11. Mycelium

Mycelium components are organic compounds that are formed from the mycelium of fungus and organic waste. Mycelium are thin roots of fungi that run underground, and it’s super strong when dried.

This 100% natural material can be grown into specific forms for different purposes:

  • Insulation. Mycelium insulation boards can be used in walls, ceilings, and roofs.
  • Packaging. IKEA is currently using this as an alternative to polystyrene.
  • Boards. Mycoboard (medium-density fibreboard) can be used much like MDF.

The mycelium brick is in development, but with a compressive strength of 30 psi compared to 4,000 psi of concrete, it has some way to go. But weighing 43 kg per cubic metre compared to 2,400 kg of concrete, its lightweight structure makes it an attractive development.

12. Cork

Cork trees grow very quickly, and the sustainable material used is resilient and flexible for flooring and insulation. It’s widely available and an incredibly cheap flooring solution.

However, some cork flooring comes unsealed, and while it's cheaper, you’ll need to arrange for it to be sealed.

Cork can also be used as ceiling tiles in libraries, classrooms, and offices as they reduce noise levels and provide good thermal insulation.

Bottom Line On Eco-Friendly Building Materials

There’s a huge amount of innovation in the construction industry right now, and the race is on to find new organic compounds and synthetics that will go mainstream.

Until then, though, we should look back on more traditional building techniques to make an environmental impact. Just because certain practices went out of fashion, doesn’t mean to say they’re not practical.

Straw, reclaimed wood, cork, and sheep wool are eco-friendly building materials solutions that, if used extensively, will edge us close to achieving our net zero targets.

Sustainable Building Materials FAQs

How do sustainable building materials affect the environment?

While most naturally associate eco-friendly with a reduction in carbon emissions, other benefits include a reduction in deforestation and the protection of wildlife, waste reduction, and the use of less toxic materials that are unsafe for humans.

Also, the creation of durable products that last longer reduces the need for frequent replacement and conserving resources in the long run.

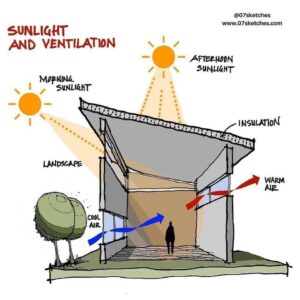
What are the main considerations when designing an eco-friendly building?

Renewable and eco-friendly materials are just one consideration when planning a sustainable construction. But there are a few other energy efficiency strategies you should consider:

  • Water conservation. Rainwater harvesting systems collect and reuse rainwater for potable water (when treated), such as cooking, bathing, and drinking.
  • Indoor air quality. Proper ventilation systems to reduce indoor pollutants and lessen the spread of harmful bacteria and illnesses.
  • Waste reduction. Implement waste sorting and disposal systems to divert waste from landfills.
  • Durability. Choose durable construction materials and methods that can withstand the test of time.
  • Lighting solutions. Maximise natural light while minimising the need for artificial lighting. Install energy-efficient lighting fixtures.
  • Smart technology. Thermostats allow the fine-tuning of the heating schedule to preserve energy.
  • Recycled material. Using recyclable materials such as recycled concrete aggregate can be used as a substitute for natural aggregates.
Categories
Planning & Design Blog

10 Best Sustainable Architecture Strategies For Public Building Design

Sustainability is no longer an afterthought when designing public buildings. The cost of implementation used to inhibit architects and prevent them from implementing eco-friendly strategies. But sustainable architecture has gone mainstream, and it’s here to stay.

At least, we hope so!

Yet, there’s more to sustainable architecture than just installing a few solar panels, planting the occasional tree, or using recycled materials. A mass adoption of the following strategies is needed to realise a cleaner, greener future.

1. Rainwater Harvesting System

Rainwater harvesting involves collecting and storing runoff in tanks or underground reservoirs. This collected water can be used for irrigation needs like gardening, flushing toilets, washing, and dishwashing machines.

Within a normal system, rainwater is classed as non-potable by UK water regulations. Unfortunately, this can’t be used for drinking, bathing, and cooking. (There are certain exceptions for off-grid properties.)

While few statistics show the savings for public buildings, a residential property can expect to save around 40–50% on water bills when using a rainwater harvesting system.

2. Green Roof System

Some of the earliest examples of green roofs date back to ancient Mesopotamia in 2500 BCE – the Hanging Gardens of Babylon, which was one of the Seven Wonders of the Ancient World. Even today in Scandinavia, sod roofs are used today to provide natural insulation. 

That doesn’t mean your planned development has to be covered in tonnes of earth to resemble a hobbit hole. Nor will you need to enlist the services of a goat to mow your roof lawn.

A typical green roof system consists of:

  1. Structural support
  2. Waterproofing membrane
  3. Root barrier
  4. Drainage system
  5. Soil or substrate
  6. Plants, grasses, and wildflowers

A green roof can raise the outside temperature of a roof by around 4.5°C in the colder months. As well as being a great insulator, it also promotes biodiversity and is a habitat for native plants and pollinators like butterflies and bees.

It’s one of the best ways to make a visible stand for sustainability, and it may inspire others to do the same.

3. Passive Solar Design

Passive solar design is an approach in architecture that harnesses the energy from the sun to heat and cool buildings, reducing the reliance on mechanical systems.

Buildings are typically faced within 30 degrees of south to allow sunlight to enter the building’s windows during the winter for natural heating (solar gain) and to provide adequate ventilation for cooling in the summer.

External shades such as roof overhangs, pergolas, and brise soleil can also be used to block excessive sunlight.

Internal wire meshes have a semi-transparent geometry and provide effective shade during summer and lowering the costs of air conditioning.

4. Room Dimensions

When drawing up plans, you should consider in detail the dimensions of each room to ensure they’re fit for purpose.

  • High ceilings may look more sophisticated, but they’re much harder to heat.
  • Rectangular or square rooms are the easiest to achieve uniform temperature distribution.
  • Open-plan spaces should be zoned effectively to stabilise temperatures and avoid waste.

Designers should also ensure that it’s possible to place furniture where it doesn’t block heat sources.

5. Thermal Mass

The choice of materials in the design of a sustainable building plays a significant role in the energy efficiency of a building.

Thermal mass refers to a building material’s ability to store and release solar heat. Concrete, brick, and stone absorb and radiate heat slowly, stabilising indoor temperatures.

It’s quite common these days to render buildings and paint them white, but white or light colours will reflect heat away from your home.

Such a strategy is great for cooling buildings on the continent in Greece, but not so much in the UK.

Also, as far as glass is concerned, Alex Wilson at Environmental Building News suggests “A growing body of experts in sustainable design argues that our architectural aesthetic should evolve away from all-glass facades.” 

6. Electric Car Charging

By 2030, it’s estimated that there will be anywhere between eight and 11 million hybrid or electric cars on our roads in the UK. By 2040, that could exceed 25 million.

To support a clean energy initiative and keep up with that demand, the UK needs over two million charge points. As of writing, there are only 61,000 in operation.

A serious investment is needed from both the public and private sectors to bridge this gap. At present, drivers face long queues to charge their cars, and that needs to change to inspire more road users to switch to electric vehicles.

7. Native Landscaping

Native landscaping is an ecological approach to development that involves the protection of native flora to promote biodiversity and local wildlife.

When developing land, it’s sometimes possible to preserve a habitat for local wildlife. Not only that but it can also be visually appealing and a source of colour as the seasons change.

Population growth and urbanisation are factors that contribute to the loss of 64 million acres of forest land globally each year.

Trees are the lungs of the planet and each tree salvaged traps carbon dioxide and improves the air quality we breathe.

8. Build To Last

One of the most eco-friendly design strategies is to ensure that the building is standing in the next 100 years. When the pharaohs built the pyramids, I’ll bet they got such a kick out of knowing that these would stand for millennia. 

Be a modern-day pharaoh!

Certain building materials have a much longer lifespan. As the old saying goes, “Buy nice or buy twice”.

For instance, soldered copper pipes used in plumbing have a life expectancy of around 70–80 years, whereas push-fit plastic pipes last around 50 years and are much more prone to leaks.

Not only that but the cost of fixing water damage can be thousands, depending on the severity.

That’s just one example.

9. Smart Building Automation

Smart technology has made rapid advancements in recent years. The internet of things (IoT) has made it possible for facility teams to monitor, troubleshoot, and control building systems remotely.

Some examples of smart building automation are:

  • Smart glass. Smart glass can change its transparency to control glare and heat gain, improving energy efficiency and the building occupants’ comfort.
  • HVAC zoning. Zoning systems divide a building into different zones, each with its thermostat and controls, to allow for precise temperature control and reduced energy consumption.
  • Daylight harvesting. Daylight sensors adjust lighting levels based on the amount of natural light available, reducing the need for artificial lighting during daylight hours.
  • Leak detection systems. Sensors detect water leaks, monitor water usage, and control irrigation systems to conserve water and prevent damage.
  • Smart power strips. These are equipped with timers, occupancy sensors, or remote-control capabilities, and they can automatically cut power to connected devices when they’re not in use.

10. Water-Efficient Fixtures

The installation of water-efficient fixtures can spare a building unnecessary expense and waste.

A faucet aerator, for example, can reduce the flow of water by up to 10 litres per minute. Couple that with a sensor, and the faucet will only dispense water when it detects a presence.

No more taps accidentally left running.

Also, waterless urinals save a substantial amount of water since they negate the need for flushing. And did you know that urinals account for 20% of water use in offices? There’s also no need to plumb in a water feed, reducing the cost and complexity of installation.

Low-flush (or dual-flush) toilets work by using less water. Traditional toilets use up to seven gallons of water per flush, while low-flush toilets use 1.3 gallons per flush (or less). 

These toilets are pretty commonplace now, but some renovations favour a classic look with toilets with a traditional pull chain. Avoid these where possible.

What Are Some Environmentally Friendly HVAC Systems?

Air Conditioning

Ductless mini-split systems provide zoned cooling, minimising energy waste by conditioning only the spaces in use. They’re suitable for smaller rooms and are fitted retrospectively as add-ons. 

They operate similarly to air-source heat pumps, and you can both heat and cool a building with just one system.

Heating

  • Air-source heat pump

An air-source heat pump is a heating and cooling system that uses the outside air as a heat source in the winter, and it extracts heat from the indoor air and transfers it to the outdoor air.

They’re much more efficient than gas and electric boilers, and they will produce three units of energy for every unit of electricity it absorbs.

  • Ground-source heat pump

Ground-source heat pumps utilise stable ground temperatures to provide efficient heating and cooling for buildings.

Before investing in a system – and this goes for air-source heat pumps too – you should check its coefficient of performance (CoP) and seasonal performance factor, which are measures of its efficiency.

  • Underfloor heating system

Underfloor heating involves running a system of pipes and wires underneath a floor. They use anywhere between 15–40% less energy than traditional radiators. They’re more efficient because in traditional systems, heat rises only in specific areas.

  • Solar power

Perhaps the most obvious choice that springs to mind when someone mentions sustainable strategies is renewable energy like solar power. 

EV panels are much more efficient and longer-lasting than they were ten years ago, and most now come with a 25-year performance warranty.

While panel performance degrades over time, an average yearly degradation of 0.5% (plus an initial 2.5% dip in the first year) will see your system operating at 85.5% efficiency after 25 years.

Few other renewable energy systems like wind turbines offer the same kind of convenience and output of solar power. 


Bottom Line On Sustainable Architecture Strategies For Public Building Design

It’s very easy for architects and designers to dismiss sustainability strategies. After all, so what if the finished building is an energy hog? The tenant pays for that… Right?

There does, of course, need to be a commercial upside to the implementation of these strategies. That often comes in the form of increased property value.

With energy bills skyrocketing, sellers and landlords are now coming under increased scrutiny over utilities costs. Gone are the days when a tenant’s only concerns were rent and rates.

Categories
Planning & Design Blog

Do I Need Planning Permission To Build An Extension?

If you’re running out of space, building an extension is much less disruptive than moving house. One stumbling block for many is planning permission – namely the rules of what you can and can’t build.You also need to brush up on the Party Wall Act and the neighbourhood consultation scheme. These pieces of legislation regulate construction activities affecting neighbouring properties to maintain harmonious relationships and avoid legal disputes between property owners.

The below guidance doesn’t apply to listed buildings, which are subject to stricter planning rules. The rules are also different if you live in an area of outstanding natural beauty. Where appropriate, consult with your local planning office.

The Original House Rule

In development guidelines, you’ll often see the term “original house”. This refers to the property as it stood on the 1st of July 1948 or on the date it was built after.

So, if the property already has an extension, you have to factor this into any future development. For example, one planning stipulation is:

You need planning permission if more than half the land around the “original house” is to be covered.

So, in this context, you need to exclude any previous developments from your calculations.

Types Of Planning Permission

There are two main types of planning applications: full planning permission and outline planning permission.

  • Full planning permission is when detailed plans are submitted for all aspects of the development, which provides certainty for construction; it’s suitable for complex projects with defined details.
  • Outline planning permission is preliminary approval based on concepts; detailed designs aren’t required at this stage, and this allows flexibility in design exploration, with reserved matters needing approval later.

Do I Need To Submit A Planning Application For An Extension?

Understanding where you require planning permission for an extension isn’t black and white. Not all extensions are built to the same specification, and the requirements differ depending on whether it’s a side, rear, front, or double- or single-storey extension.

All extensions

You need planning permission if any of the following are applicable to your extension:

  • It’s forward of the front or side of the “original house” that faces onto a highway
  • Over half the land around the “original house” will be covered
  • Materials used aren’t similar to the existing house (except conservatories)
  • The building will be higher than the highest point of the house
  • Eaves and ridge height are higher than the existing house (single- and two-storey)
  • Eaves height is more than three metres (if within two metres of the boundary)
  • The building includes the addition of verandas and balconies.

Side extension

You need planning permission if any of the following are applicable to your side extension:

  • Higher than four metres
  • More than one storey
  • Wider than half the width of the “original house”.

Single-storey rear extension

You need planning permission if any of the following are applicable to your single-storey rear extension:

  • Higher than four metres
  • A semi-detached house that extends beyond the rear of the “original house” by more than six metres
  • A detached house that extends beyond the rear of the “original house” by more than eight metres.

Two-storey rear extension

You need planning permission if any of the following are applicable to your two-storey rear extension:

  • Extends more than three metres beyond the rear of the “original house”
  • Within seven metres of the boundary opposite rear wall
  • Pitch of the roof pitch doesn’t match the existing property
  • Side-facing windows are not obscure-glazed and can open.

Understanding The Party Wall Act

The Party Wall Act 1996 exists to prevent and mitigate disputes between neighbours. The law requires that you give notice to a neighbour if you are:

  • Building near the boundary of a neighbour
  • Working on a wall that separates your property from a neighbour’s.

It’s strongly recommended that you familiarise yourself with the Party Wall Act 1996 here.

The Neighbour Consultation Scheme Explained

If you’re planning to build a large single-storey rear extension, you’ll need to contact your local planning authority through a Prior Approval application.

Important! Your extension is classed as “larger” if it’s between 4–8 metres for a detached house or 3–6 metres for a semi-detached house.

Neighbours can object to your home extension, which can be investigated by your local council.

It allows neighbours to be informed about larger extensions, and it gives them an opportunity to express concerns or object to the development.

Generally, if the extension falls within the permitted guidelines, no action will be taken that results in you needing to apply for planning permission or remove the extension. However, the power rests firmly with the local authority to assess whether the project’s impact on surrounding properties is acceptable.

After the application has been submitted, the determination period lasts for 42 days.

Lawful Development Certificate (LDC)

While your permitted development rights may mean that you can proceed with your extension without planning permission, if you’re concerned about neighbour disputes, you can apply to your local planning authority to obtain a lawful development certificate.

It’s not a legal requirement to obtain one, but it serves as proof that your development is lawful, meaning you can carry out your project with confidence.

The costs to obtain a certificate vary depending on your country:

  • England – £103
  • Scotland – £101
  • Wales – £85

Important! The fee is double if you’re applying in retrospect, that is, for a construction that has already taken place.

If you decide to use your permitted development rights (without needing planning permission), you may jeopardise your project. If your extension deviates from the rules, you risk being fined or forced to demolish the work.

It’s also likely that you’ll need a lawful development certificate at some point, anyway. If you decide to sell your property, in the absence of legal documentation, many buyers will be dubious when purchasing a property that’s been extended.

The 45-Degree Rule Explained

Imagine you’re looking at your floor plans from a bird’s-eye view. Using the midpoint of your neighbour’s nearest window, draw a 45-degree angle away from the window.

If your extension is within this line, it’s deemed acceptable; if it intercepts, then it’s likely that overshadowing will occur (loss of daylight).

The “right to light” gives a landowner the right to receive light through defined apertures in buildings on their own land which neighbouring properties have to take into consideration.

Planning Permission For Extensions – Bottom Line

After assessing the guidelines within, you should have a stronger idea about whether you need planning permission for your extension.

Even if your extension falls under your permitted development rights, and if you proceed to build without planning permission, applying for a lawful development certificate will give you peace of mind before commencing construction.

For specialist projects or if you need any further advice, contact your local planning authority or a planning consultant. If you live in Wales, Planning Aid provides free expert advice.

Planning Permission FAQs

Are building regulations the same in England and Scotland?

Building regulations in England and Wales are set out in the Building Act 1984, and those in Scotland are set out in the Building Act 2003 (Scotland).

So if you’re a developer planning a project spanning multiple locations across the UK, you’ll need to factor in localised regulations. For example, in Scotland, sprinkler installations are mandatory in flatted accommodation, larger multi-occupancy dwellings, and places that deliver care.

What is the difference between building regulations and planning permission?

Building regulations determine the minimum standard for the design and construction of buildings. The regulations are primarily concerned with structural stability, safety, and technical compliance.

Planning permission relates more to the external appearance of the building and ensures any landscaping considerations are in keeping with the local environment to deter inappropriate developments.

What is the 4-year rule for planning permission in the UK?

The four-year rule (which applies to dwellings under class C3) states that local authorities can’t serve enforcement notices for unauthorised developments four years after the commencement of the development.

Despite the rule helping many homeowners gain retrospective planning permission, the four-year rule is set to be phased out in 2023 – thereby closing the loophole.

What is retrospective planning permission?

Retrospective planning permission is sought after building work has already been completed when the necessary permission hasn’t already been obtained. A council may request that you apply for this, for example, if you have constructed a house extension with different materials than what was originally granted.

Categories
Planning & Design Blog

How To Plan A Construction Project: Your Step-By-Step Project Plan

The principles of planning any construction project are the same, regardless of whether it’s a large or small project. If you’re undertaking a project – maybe you’re planning a self-build, an extension, or commercial premises – there are certain steps to follow to meet your goals on time in full.

So many construction projects fail due to inadequate planning, which leads to scope creep, productivity delays, poor communication, and overspending.

It’s not enough to simply plan. You need to plan properly and follow a set of tried and tested steps in the correct sequence.

The Five Phases Of Construction Planning

Broadly speaking, there are five phases of construction planning. Understanding these will help you know what to expect at each stage to deliver a successful outcome.

  1. Initiation: Project conception and determining the budget, stakeholders, and resources required.
  2. Planning: Defining the work activities and creating a schedule with specific and measurable goals.
  3. Execution: Assigning contractor teams tasks and implementing the project plan.
  4. Monitor: Tracking progress and performance.
  5. Control: Wrapping up the project and evaluating the performance.

Right now, you’re likely at the initiation or planning stage. If you’re further along, and if the execution phase is already underway, it’s a good idea to halt any further site activity until you’ve got a robust plan of action together.

Your Construction Management Plan

Now that you’ve got a general idea of the main phases, it’s time to break down the steps you need to take to bring your conception to life.

1. Define The Project Scope

First, you need to understand what your project is, that is, the project’s purpose, goals, and what you aim to achieve. In short, what’s your vision?

At this stage, you should be able to specify the outcomes, such as the building’s size and boundaries, including any exclusion zones.

After defining what the project is, it’s also worthwhile detailing what the project isn’t. You should have a firm idea about exclusions, such as:

  • Site preparation
  • Decoration and furnishing
  • Landscaping

You should enlist the services of an accredited architect to create your initial design concepts, sketches, and technical plans and drawings.

2. Define Your Project’s Budget

Once you’ve decided where to carry out the construction (for instance, you may have had an offer accepted on some land), it’s time to work out your budget to see if it’s financially viable.

The main costs associated with your project are:

  • Labour
  • Materials
  • Architect services
  • Equipment and tools
  • Land acquisition
  • Loans and financing
  • Construction project management

Fear not! Gone are the days when you have to manually punch an exhaustive list into a spreadsheet and research each cost individually.

Using BuildPartner cost estimation software, you can get a full itemised breakdown of cost options in a matter of minutes, slashing the administration time associated with quoting each project.

You can also choose from a comprehensive list of à la carte-style selections. Products and prices automatically pull through based on the parameters you set.

Best of all? Getting started won’t cost you a penny. Try it out free today by clicking here.

With BuildPartner construction software, you’ll never let a single item go unaccounted for.

3. Get Planning Permission

Okay, so now the ball is rolling, you should seek planning permission for your build.

There are two main types of planning application: full planning permission and outline planning permission.

Outline planning permission is far less detailed than full planning permission. You are essentially asking the local planning authority to agree to the principle of development – with specifics called “reserved matters” to be addressed later.

Whichever type of permission you require, it’s important to get it before proceeding to the next stage. If you’ve had an offer accepted on some land or a property but the planning application is unsuccessful, and if contracts haven’t been exchanged, you can legally pull out of the process, sparing yourself huge expenses.

It usually takes around eight weeks to get planning permission, so you’ll want to submit your application early to avoid delaying completion.

4. Create A Project Schedule

Once you’ve got visibility of your costs, you’ll then want to pull together a construction schedule. Some people swear by construction planning software, and that’s something you’ll want to take a look at if you’re in the habit of planning multiple construction projects.

For someone planning an individual project, a Gantt chart more than suffices. In fact, construction management software always includes one of these as a main feature.

You can find templates for construction Gantt charts on smartsheet. Follow the tips in this video to get started with your first project.

If you’re new to this, a Gantt chart is essentially a visual snapshot of all the tasks that need to be completed by a certain time.

When mapping out your construction activities, you should avoid listing individual tasks and instead think of the Gantt chart as a snapshot of smaller projects.

So instead of listing things like “connect waste pipes”, “plumb in toilet”, and “install bath and shower cubicle”, just write “complete second fix plumbing” which encompasses all the aforementioned.

Keep it simple. Nobody likes a micromanager.

5. Complete A Risk Assessment

While most people immediately think about health and safety when it comes to risk assessments, there are other risks you need to consider that could disrupt your project.

  • Weather conditions such as wind, rain, and heavy snow.
  • Supply chain disruptions and shortages can drive prices up of raw materials.
  • Contractual disputes with subcontractors and disagreements with stakeholders.
  • Natural disasters, mainly flooding and storms in the UK.
  • Financial issues such as cash flow bottlenecks and funding shortages.

There are also other specific risks to your project that you need to be aware of. For instance, environmental protestors blocking a proposed warehouse; or your project may involve bridge or viaduct repair, meaning work has to be carried out during off-peak hours to minimise traffic disruption.

And believe it or not, if a bird’s nest is found on-site, in accordance with the Wildlife and Countryside Act 1981, any works with the potential to damage the nest, egg, or young birds must stop until the young have fledged.

The sample also applies to other protected species, such as bats, otters, adders, and red squirrels.

A full risk assessment should include details of the technical, managerial, environmental, social, and commercial risks.

6. Assign A Project Manager And Assemble Your Team

Getting the right people in the right place at the right time is key to executing your project. Work out who will be accountable for what, and come up with a plan of action to communicate regularly with your project team.

7. Execute The Construction Phase Plan

The goal of the construction project manager is to manage the relationship between the project budget and schedule. That’s easier said than done, of course, but stray from the schedule and you’ll likely wind up throwing money at your problems to make up for lost time.

Delivering a project on time is one thing, but quality control is another. The internet is saturated with new-build horror stories with shoddy brickwork, rising damp, leaks, and countless snags.

Cutting corners will only cause you more problems in the long run.

8. Measure Project Progress And Rework The Plan

Sometimes there are some hidden nasties you can’t foresee during the planning process. One example is the regulatory change that came into effect in June 2022 that requires all new-build homes and commercial buildings in England to be installed with electric vehicle charging points.

For those building an entire estate of new-build homes now, the average cost per installation is between £500 to £1,000.

Other things to be mindful of are:

  • Hidden structural issues
  • Changes in client requirements
  • Safety concerns

How To Make A Construction Plan – Bottom Line

From conceptualisation to execution, a well-structured project management plan guides every aspect of your construction project, ensuring efficient resource allocation, realistic timelines, and smooth coordination among your stakeholders.

If you or your construction manager follow the steps in this guide, you’ll have all your main bases covered before, during, and after your project.

Construction Project Plan FAQs

What is the most common problem in construction projects?

Cost overrun is the top construction industry problem, that is, when a project exceeds its pre-planned budget. A McKinsey study estimates that 98% of big construction projects incur cost overruns of more than 30%.

So, if you’re planning a big project, factor that 30% in on top of your initial budget to see if it’s still viable.

How can I avoid scope creep in my construction project?

The best way to avoid scope creep is to set clear and measurable project objectives that are defined at the outset. If there’s any risk of scope creep, you should clearly communicate this with all stakeholders and discuss contingencies.

Some flexibility is important for minor changes to the plan, but you should know when to say no. Otherwise, the scope of the project will continue to grow arms and legs.

What is the design-bid-build method?

The design-bid-build method involves the completion of three distinct phases in sequence. In essence, the construction process doesn’t start until the design and bid phases are complete, so there’s no overlap between design and construction.

This gives the owner greater control over the design quality and scope. They can review and approve the design before the project is put out for tender (or bidding). There are typically fewer change orders, and there’s much greater cost certainty from the outset.

As for the design-build method (a more traditional method of delivery), the design and construction services are awarded to a single entity that oversees the entire scope of the project. The benefit of this is a shortening of the delivery schedule due to overlapping the design and construction phases.

Categories
Planning & Design Blog

What is a Cost Plan in Construction? And Why Are They Needed?

A cost plan is an essential tool for any construction project, providing a detailed outline of the estimated costs associated with a project's various elements. This article will discuss the importance of cost plans, how different specifications and scopes impact them, and the stages in which they are needed. We will also explore how BuildPartner automatically creates a Cost Plan for users using its software, based on UK material costs, and how this benefits architects, builders, and developers.

What is a Cost Plan?

A cost plan is a document that breaks down the various elements of a construction project and provides detailed cost estimates for each component. This includes costs related to materials, labor, equipment, and other expenses associated with the project. A cost plan is typically structured in a way that allows for easy tracking and updating of costs throughout the project's duration. It serves as a valuable reference for all parties involved in the project, including clients, architects, engineers, contractors, and subcontractors.


BuildPartner's Cost Plan

When are Cost Plans Needed During the Construction Process?


Cost plans are typically developed during the design and pre-construction phases, with updates occurring at various stages:

  1. Concept Design Stage: An initial cost plan is created based on preliminary project specifications and scope.
  2. Detailed Design Stage: As the design is refined and more information becomes available, the cost plan is updated to reflect the changes.
  3. Tender Stage: Once the project has been tendered and contracts are awarded, the cost plan is updated to include contractor pricing.
  4. Construction Stage: The cost plan is continually updated throughout construction to track actual costs against the estimates, allowing for adjustments as needed.

The Importance of a Cost Plan

Cost plans are crucial for several reasons:

  1. Budget Management: They help clients and project teams manage the budget throughout the project, ensuring that the costs stay within the allocated funds.
  2. Risk Mitigation: They identify potential risks and cost overruns early in the project, allowing for proactive measures to be taken to avoid issues.
  3. Decision Making: Cost plans provide a clear picture of the project's financial feasibility, allowing clients and stakeholders to make informed decisions about scope, design, and specifications.

Different Specifications and Scopes Impact on Cost Plans

Various factors, such as project specifications and scopes, can impact a cost plan. High-end materials, such as marble or granite, will significantly increase the overall cost, while more affordable materials like concrete or vinyl can lower the cost. Similarly, project scope variations, such as adding or removing elements, will affect the cost plan. It is crucial to consider these factors when developing a cost plan to ensure accurate and realistic estimates.

How BuildPartner Automates Cost Plans

BuildPartner's software automatically generates a cost plan for users, based on the latest UK material costs. This tool provides architects, builders, and developers with an accurate and up-to-date cost plan, saving them time and effort.

By using BuildPartner's software, users can benefit from:

  • Instant access to current UK material costs
  • Automatic cost plan generation based on project specifications and scope
  • Easy adjustments to cost plans as project details change
  • Improved budget management and decision-making capabilities

In conclusion, cost plans are a vital component of successful construction projects, helping teams manage budgets, mitigate risks, and make informed decisions. BuildPartner's software automates this process, providing users with accurate cost plans based on the latest UK material costs. To learn more about how BuildPartner can benefit your next construction project, visit https://buildpartner.com/.

Categories
Planning & Design Blog

How to Create a Realistic Construction Budget and Stick to It

Creating a realistic construction budget is essential for the success of your project. A well-planned budget helps you manage costs, make informed decisions, and avoid unpleasant surprises. In this article, we’ll discuss how to create a construction budget and provide tips to help you stick to it.

Understand the Scope of Your Project

The first step in creating a realistic construction budget is understanding the scope of your project. This involves identifying your objectives, desired outcomes, and specifications. Different specifications can significantly impact the overall cost of your project. For example, choosing high-end materials or custom designs will likely result in higher expenses.

Research Costs and Obtain Quotes

Researching construction costs in your area will give you a better understanding of the average building costs per sq m and builders’ rates. Obtain quotes from multiple contractors to get a clearer picture of the market rates and to identify any price variability. Make sure to request detailed quotes that include labor, materials, and any additional costs to help you make informed decisions.

Create a Contingency Fund

Unexpected expenses can arise during construction, so it’s crucial to include a contingency fund in your budget. Typically, allocating 10-20% of your total budget for contingencies is a good practice. This reserve can help you manage residential construction costs during volatile times and cover any unforeseen expenses.

Monitor and Track Expenses

Keeping a close eye on your project’s expenses is essential to ensure you stick to your budget. Regularly monitor and track costs, comparing them to your initial estimates. If you notice significant deviations or increasing costs, take action to adjust your spending and remain within your budget.

Communicate with Your Construction Partner

Maintaining open communication with your construction partner is key to staying on budget. Discuss any changes in scope, materials, or schedule that may affect costs.

Review and Adjust Your Budget as Needed

As your project progresses, you may need to make adjustments to your budget. Review your budget regularly and make any necessary changes to accommodate new expenses or savings. Staying proactive in managing your budget will help you maintain financial control over your project.

Utilize Estimating Software

Basic estimating tools, such as BuildPartner, can help you create a realistic budget and monitor expenses throughout your project. These tools can provide valuable insights into construction costs, allowing you to plan and manage your budget effectively.

Conclusion

Creating a realistic construction budget and sticking to it requires careful planning, research, and ongoing monitoring. By understanding the scope of your project, researching costs, obtaining quotes, creating a contingency fund, tracking expenses, communicating with your construction partner, and utilizing estimating tools like BuildPartner, you can successfully manage your construction budget and ensure a successful outcome. Stay informed about the latest UK material construction cost trends and other factors that may impact your budget by visiting BuildPartner’s comprehensive resources.

Categories
Planning & Design Blog

How to Choose the Right Construction Partner for Your Project

Choosing the right construction partner is crucial for the success of your project. With so many builders available, it can be challenging to find the perfect match for your needs. In this article, we’ll share tips on selecting the best construction partner and discuss online tools to help you make an informed decision.


Online Tools to Find the Right Builder

There are several online platforms that can help you find reputable builders in your area. Two popular options include:

Both platforms offer a wide range of information on builders, including reviews, ratings, and portfolios. Use these tools to shortlist potential construction partners and gather more information about their services.


Get Referrals and Multiple Quotations

Word of mouth is still one of the best ways to find reliable builders. Talk to friends, family, or colleagues who have recently completed construction projects and ask for their recommendations. 

Once you have a shortlist of potential construction partners, request multiple quotations. Comparing different quotes will give you a better understanding of the average building costs and builders’ rates in your area. This can also help you identify any price variability among the builders and negotiate better deals.


Evaluate Experience and Reputation

A construction partner’s experience and reputation are essential factors to consider. Check their work history, client testimonials, and any industry awards they may have received. Look for a builder with a proven track record of successfully completing projects similar to yours.

In addition, research how they manage residential construction costs during volatile times and their approach to handling factors that cause construction costs to vary. You may also want to review the latest UK material construction cost trends and how they affect project costs. Understanding a builder’s approach to these challenges can provide insight into their ability to adapt and make smart decisions.


Communication and Responsiveness

Effective communication is crucial for a successful construction project. Choose a construction partner who demonstrates strong communication skills, listens to your needs, and provides timely updates. Responsiveness to questions and concerns is essential, as it can help prevent misunderstandings and ensure that your project stays on track.


Evaluate Contracts and Warranties

Before signing a contract with your chosen builder, thoroughly review the terms and conditions. Make sure you understand the project timeline, payment schedule, and any penalties for delays. Also, inquire about warranties and guarantees for workmanship and materials. A reputable builder should provide a warranty that covers any defects or issues that may arise after the project’s completion.


Conclusion

Choosing the right construction partner is a critical decision that can greatly impact your project’s success. By using online tools like Houzz and Checkatrade, seeking referrals, obtaining multiple quotations, and considering factors such as experience, reputation, communication, and contract terms, you can find a builder that fits your needs and ensures a successful outcome. For more information on construction costs and trends, explore BuildPartner and its comprehensive resources.


Categories
Planning & Design Blog

What to do to reduce price variability


In our previous post we discussed how Natural variability in price causes price discrepancies between each project. In this article we will be discussing how you would go about reducing price variability between your construction projects.


1. Plan as comprehensively as possible

The more you can understand the price implications of different decisions the better, this involves getting information from designers, builders, and other industry professionals. Frankly, it is not a simple task but the more you do the more likely you are to get the result you want. Of course you can pass on some of this responsibility to your interior designer, architect or builder or instruct a project manager. All these options are good, they will simply come with an additional cost and perhaps some particular leanings.

2. Create a complete and accurate brief

A detailed and consistent description of the work is essential for all parties to be able to work effectively together.

3. Ensure detailed specifications

Create a list with materials researched and priced and avoid unnecessary variability.

4. Research suitable companies

Good matches in terms of size and spec of project will narrow the range and increase the level of appropriate advice.

5. Ensure comparable quotes

Use an itemised Excel document to ensure like for like comparison.

6. When negotiating, think about what’s in it for them

Builders do not purposefully price high to catch people out. They price what they think is appropriate. It may be sensible for them to round up rather than down initially so you can keep an eye out for that. But even in the act of quoting you may be changing the scope so just help them out.

7. Keep clear records

During the process and even as the project progresses prices and specifications will change, clear records will ensure consistency and avoid disputes.


Overall

–   People aren’t out to get you, construction prices are naturally variable

–   Price has certain key components, all of which you can control

–   Negotiation is a tiny fraction of the overall variability, a clear scope is much more important

Therefore preparation is the best way to find a certain and appropriate price.

And, use BuildPartner 🙂

Categories
Planning & Design Blog

How to manage residential construction costs during volatile times

COVID and Brexit have sent residential construction costs on a roller-coaster ride. We break down what is causing the pricing volatility and how to manage it.

How much did construction costs increase in 2021?

Over recent decades, labour, materials, and margin components have been fairly stable which made it easy to manage changes. However, in the last few years, all three of these components experienced significant shocks:

  • MATERIALS PRICES: Global supply and transport issues, which were predominantly caused by COVID, have now been compounded by UK-based supply chain issues. This has reduced supply and increased key materials prices by an average of 20-30%. 
  • LABOUR PRICES: There has been a reduction in labour supply mainly caused by Britain leaving the EU. As a result, labour prices have increased by around 2 - 5%. 
  • MARGIN: The complications with material supplies and labour have created difficulties for construction companies and reduced their actual profit margins in the short term. As a reaction against this volatility, overall margins are being increased. Both due to the increased operating costs but also as a contingency against future price increases, generally around 2 - 10%. 

If you put these price increases together the fundamental (long term) cost of carrying out a project is likely to increase in price by around 5 - 10%. If we apply this to the average project on our platform, which is £250k, this would equate to an increase of £12.5 - £25k. Though this is a significant amount, it is actually less than the current sentiment might suggest. 

This is because volatility itself creates price changes that are higher than the fundamental increases because contractors are increasing their margins further to guard against future volatility. 

This is a move that has been somewhat enabled by the higher than usual demand and limited supply. The impact is harder to calculate but anecdotally has been seen to increase margins by another 10 - 15% and therefore overall 15 - 25%. 

Will construction costs continue to rise or go down in 2022?

This is of course difficult to predict. However, we’ve spoken to a range of materials suppliers, contractors, and quantity surveyors. 

  • MATERIALS PRICES will continue to be affected by shortages for perhaps another six to twelve months, hopefully decreasing in severity over that period. 
  • LABOUR PRICES may remain higher, it is difficult to predict how much of the increase is a result of COVID versus leaving the EU but we think probably will stay for the long term. 
  • MARGIN will reduce relative to the material supply issues over the next six months and also reduce as labour supply and construction demand normalises. 

However, these are the fundamental supply-side costs, as mentioned above, psychology and demand have the potential to cause even more dramatic swings. These are harder to predict although, we would expect them to similarly reduce over time. 

How BuildPartner can help manage volatile pricing

BuildPartner creates price transparency in small construction work. To do this, it provides a pricing platform for project managers, contractors, and homeowners. The product provides benchmark costs based on a series of templates, a scheduling tool showing live average prices, and quote creation and comparison functionality.

Therefore, since it collects live price information, it is in a unique position to provide help during this volatile period.

At its heart, BuildPartner is a big database of tasks and prices which can be selected, viewed and analysed in different ways at different times. The price information for which comes from three sources: 

  • Project managers input materials and their prices.
  • Contractors input labour, materials, and margin.
  • Quantity surveyors and estimators research and check all of the above.

We monitor changes within these accounts, compare them to other market sources such as materials suppliers then aggregate those changes. Any major deviations we manually update in our average prices and suggest that builders make these changes in their accounts. 

Project cost management: What to do about it

From our point of view

Our core responsibility to clients is to provide accurate price information for budgeting. Since project lifecycles from ideation to completion range from a few months to several years, we must take at least a medium-term view. If we were to react too dramatically to short-term shifts, we would end up skewing peoples’ plans unnecessarily. 

We think labour and margin are subject to some infrastructural shifts as we have seen this reflected in our builders’ accounts. Therefore we have slightly increased the default labour rates and margins in our benchmark prices by 3-5%. However, we would recommend a 10% contingency to handle short-term changes, especially in materials prices. 

From the architects’ and contractors’ point of view 

There is no doubt this is a difficult period. For those who have a time horizon shorter than 6 months, the answer might be to grin and bear it. But for those who have a longer time horizon, consider waiting for prices to stabilize. 

However, we are seeing certain patterns being repeated which we recommend avoiding: 

  1. If you shop around and miraculously find a cheaper than expected quote, both from main contractors and subcontractors, beware, it is likely to be a mistake or an inexperienced business. 
  2. Budget additional time and therefore money for lead times on materials. Do not trust the lead times materials suppliers give you. Though it is not their fault, they cannot say with reasonable certainty what will happen. So double your lead time and assume an effect on preliminary costs and overheads as a result. 
  3. Collaborate and be open with your pricing. Homeowners and builders will have different appetites for risk so finding the right balance will result in the right price. For example, you could consider advising homeowners to accept provisional sums for certain materials. This way a margin for risk will not need to be added to the quote, but instead, advise a personal contingency of 10 - 15% which may or may not be needed. 
  4. If anyone you’re working with is looking unusually stressed, offer support. This is a difficult period for everyone.
  5. And of course, use BuildPartner. The process will be significantly easier.